Guides › Photos on Mac
How to resize photos for Instagram on Mac
Updated 15 October 2026 · by Vistaar Studio
Short answer: make the photo 1080 pixels wide and give it a shape between 1.91:1 (landscape, 1080 × 566) and 3:4 (portrait, 1080 × 1440); Instagram keeps those without cropping. For a tall feed post, use 1080 × 1350 (4:5) or 1080 × 1440 (3:4). On a Mac, crop to that shape in Photos (Edit › Crop › Aspect) and export with a custom width of 1080, or do a whole folder with sips in Terminal.
Instagram is built around phones, so photos from a camera, a design app or a 3D renderer often arrive the wrong shape. Upload a wide 16:9 shot or a tall 9:16 one and Instagram trims it to fit, sometimes cutting off exactly the part you cared about. Doing the crop and resize on your Mac first means you decide what stays in the frame.
The sizes Instagram actually keeps
Instagram's own help page says it uploads photos at up to 1080 pixels wide. A photo between 320 and 1080 px wide keeps its resolution as long as its shape is between 1.91:1 and 3:4. Anything wider than 1080 is sized down to 1080, anything narrower than 320 is enlarged, and anything outside that range of shapes is cropped.
| Post shape | Ratio | Size to export | Good for |
|---|---|---|---|
| Portrait (tallest) | 3:4 | 1080 × 1440 px | Phone photos, people, rooms; the most screen space |
| Portrait | 4:5 | 1080 × 1350 px | The long-standing "safe" tall size; works with most scheduling tools |
| Square | 1:1 | 1080 × 1080 px | Products, logos, quotes |
| Landscape (widest) | 1.91:1 | 1080 × 566 px | Panoramas and wide scenes (shows small in the feed) |
| Stories and Reels | 9:16 | 1080 × 1920 px | Full-screen; keep text away from the top and bottom edges |
Two practical notes. First, a portrait shape takes up much more of the feed than a landscape one, so tall usually wins. Second, in a carousel (several photos in one post) every slide is shown at the same shape, so crop all of them to one ratio before you upload.
Method 1: Photos app (one or a few photos)
Photos has proper aspect-ratio crops built in, and it never touches your original: you can always revert.
- Open the photo in Photos and click Edit, then Crop.
- Click Aspect and pick Square, or 8:10 for a 4:5 portrait (it's the same shape). For 3:4, choose Custom and type 3 and 4. Make sure the frame is portrait, not landscape; there's a toggle next to the ratios.
- Drag the photo inside the frame to choose what stays, then click Done.
- Choose File › Export › Export 1 Photo (or Export X Photos for several).
- Set Photo Kind to JPEG, Quality to High, Size to Custom, and Max: Width to 1080.
- Click Export and choose a folder.
You can select several edited photos and export them together with the same settings, which covers a carousel nicely.
Method 2: Preview (photos in a folder)
Preview has no ratio presets, but it shows the selection size while you drag, so you can crop by numbers. Work on a copy (⌘ D in the Finder) because Preview saves into the file itself.
- Open the copy in Preview and drag a selection. Watch the pixel size shown as you drag and aim for a 4:5 shape, for example 1600 × 2000 or 2400 × 3000.
- Press ⌘ K to crop.
- Choose Tools › Adjust Size, set units to pixels, tick Scale proportionally, and type 1080 as the width. Click OK.
- Choose File › Export, pick JPEG, and save.
If you're a few pixels off (1080 × 1347, say), Instagram won't mind; it only crops when the shape falls outside the allowed range. For many photos at once, Preview's Adjust Size works on all selected thumbnails, as in our batch resize guide, but you'd still crop each one by hand.
Method 3: Terminal (a whole folder, centre-cropped)
macOS includes sips, which can crop from the centre and resize in one go. This turns every landscape JPEG in a folder into a 4:5 portrait of 1080 × 1350, writing new files to an insta folder and leaving the originals alone. We tested it on macOS 26.2.
- Open Terminal, type
cd(with a space), drag your photo folder onto the window, and press Return. - Paste this and press Return:
mkdir -p insta
for f in *.jpg; do
  h=$(sips -g pixelHeight "$f" | awk '/pixelHeight/{print $2}')
  sips -c "$h" $((h*4/5)) "$f" --out insta/ >/dev/null
done
sips -z 1350 1080 -s formatOptions 85 insta/*.jpg
What it does: sips -c crops each photo to its full height and four-fifths of that as the width, from the centre; sips -z 1350 1080 then sets the exact size (height first, then width) at JPEG quality 85. For squares, use $h instead of $((h*4/5)) and -z 1080 1080.
Limits worth knowing: it assumes landscape photos (a tall photo that's narrower than 4:5 gets black bars added at the sides instead of being cropped; we checked), *.jpg doesn't match .JPG or .heic files (convert those first with our HEIC to JPG guide), and a centre crop can cut off a subject standing at the side. Check the results before posting.
Do you even need to resize?
Sometimes not. A normal iPhone photo held upright is already 3:4, a shape Instagram accepts, and Instagram shrinks it to 1080 px wide itself. Resizing first is worth it when the photo is the wrong shape (screenshots, renders, 16:9 camera shots), when you want to pick the crop yourself, or when you're uploading lots of large files on a slow connection. Never enlarge a small photo to 1080; it adds blur, not detail.
Doing a lot of them: a batch resizer
If you post often, or prepare photos for clients, cropping one at a time in Photos gets old. We make Pictailor, a batch photo resizer for Mac, so read this part knowing that. It has ready-made social sizes: choose Instagram portrait, select every photo in the list, and press Save.
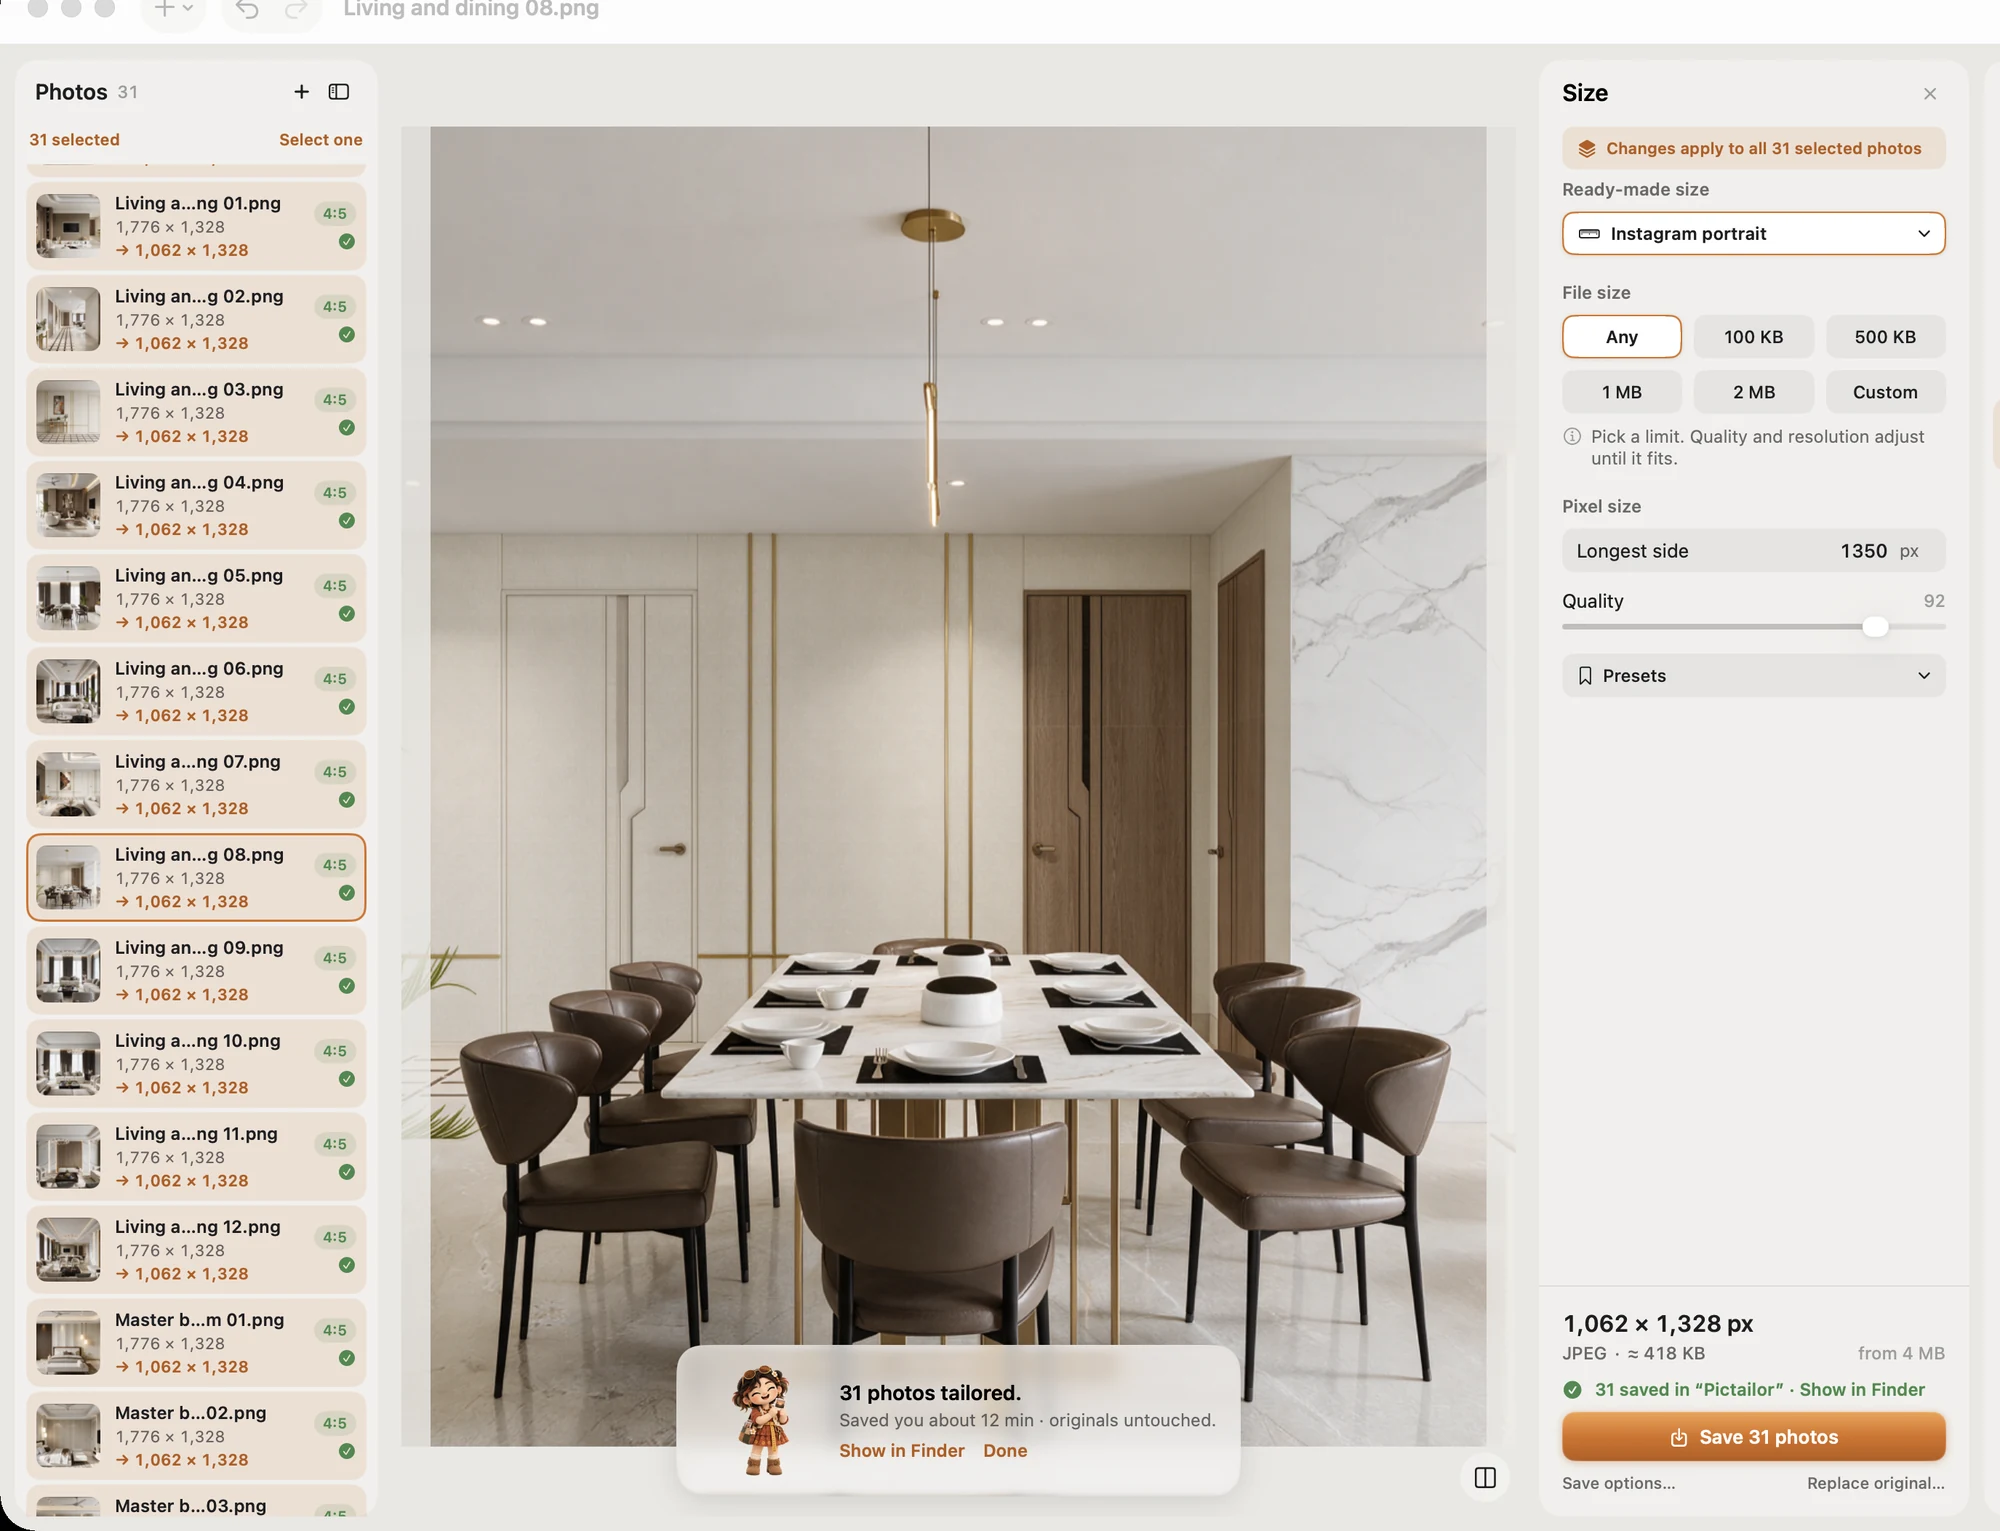
- Resizes and crops a whole folder in one Save. Originals are never changed: copies go into a Pictailor folder beside them.
- Never enlarges a photo, as the screenshot above shows: smaller originals stay at their own size rather than being stretched.
- Can also compress to an exact file size, such as under 500 KB or 1 MB, checked on the real saved file.
- Ready-made sizes for online shops, passport and ID photos, exam photos and signatures too.
- Works with JPEG, PNG, HEIC, TIFF and more, and from the Finder's right-click menu (Services) without opening the app.
Pictailor is available now from vistaar.studio for $5 (₹499 in India), paid up front, with a licence key for 1 Mac. It's also on the Mac App Store for $4.99. It runs on Apple Silicon and Intel Macs with macOS 15 or later. Meet Pictailor →
FAQ
What size should a photo be for Instagram?
1080 pixels wide, with a shape between 1.91:1 (1080 × 566) and 3:4 (1080 × 1440). Common picks are 1080 × 1080, 1080 × 1350 and 1080 × 1440.
Why does Instagram crop my photo?
Its shape is wider than 1.91:1 or taller than 3:4. Crop it to 4:5 or 3:4 yourself first so you choose what stays.
Do I need to resize iPhone photos for Instagram?
Usually not: upright iPhone photos are 3:4, which Instagram accepts, and it scales them to 1080 px wide itself.
How do I resize a photo to 1080 × 1350 on a Mac?
Photos › Edit › Crop › Aspect 8:10, Done, then File › Export with Size: Custom, Max Width 1080. For a folder, use the sips commands above.
What size is an Instagram story?
Full-screen 9:16, so 1080 × 1920 px. Keep text and faces away from the top and bottom edges.
Can I post to Instagram from a Mac?
Yes, at instagram.com in your browser, using Create. Or AirDrop the photos to your iPhone and post from the app.