Guides › Clipboard on Mac
How to copy and paste a screenshot on Mac
Updated 19 October 2026 · by Vistaar Studio
Short answer: hold Control with the usual screenshot keys. Control ⇧ ⌘ 4 lets you drag over part of the screen and copies it instead of saving a file; Control ⇧ ⌘ 3 copies the whole screen. Then press ⌘ V to paste it into Messages, Mail, Slack, Notes or a document.
By default a Mac saves every screenshot as a PNG file on the desktop. That's fine when you want to keep it, but most screenshots are throwaways: a bit of an error message for IT, a price to send a friend, a chart for a chat. Copying them straight to the clipboard skips the desktop clutter. Here's every way to do it, how to make it the default, and the one catch.
1. The shortcuts: add Control
Apple's rule is simple: press Control together with the keys you'd normally use, and the screenshot goes to the clipboard instead of a file.
| What you want | Save as a file | Copy to the clipboard |
|---|---|---|
| Part of the screen | ⇧ ⌘ 4, then drag | Control ⇧ ⌘ 4, then drag |
| One window or menu bar | ⇧ ⌘ 4, Space, click | Control ⇧ ⌘ 4, Space, click |
| The whole screen | ⇧ ⌘ 3 | Control ⇧ ⌘ 3 |
A few things that make it easier:
- You can add Control late. Press ⇧ ⌘ 4 as usual, then hold Control while you drag or click. As long as Control is down when the capture happens, it's copied.
- Window shots without the shadow: hold ⌥ Option as you click the window.
- Cancel with Esc at any point before you let go.
- You'll hear the camera sound, but nothing appears on the desktop. That's how you know it worked.
2. Make the clipboard the default
If you almost never keep screenshots, you can send all of them to the clipboard so you don't need Control at all:
- Press ⇧ ⌘ 5 to open the Screenshot toolbar.
- Click Options.
- Under Save to, choose Clipboard.
- Press Esc to close the toolbar.
Now ⇧ ⌘ 3 and ⇧ ⌘ 4 copy instead of saving. To go back, open the same menu and choose Desktop (or Documents, or Other Location for a dedicated Screenshots folder, which is a nice middle ground).
3. Copy a screenshot you've already taken
Took a normal screenshot and want it on the clipboard after all? While the little thumbnail is still in the bottom-right corner, Control-click it and choose Save to Clipboard. If the thumbnail has already gone, select the file on the desktop and press ⌘ C: most apps (Mail, Messages, Notes, Slack) will paste the image, though some text fields will paste the file name instead. Or open it in Preview, press ⌘ A and ⌘ C to copy the picture itself.
4. How to paste a screenshot, and turn it into a file
Press ⌘ V wherever you want the picture: an email, a chat, a note, a Pages or Word document, a Keynote slide, a design app. With Universal Clipboard turned on, you can also paste it on your iPhone or iPad, or on another Mac nearby.
The Finder can't paste an image as a new file, but Preview can:
- Open Preview.
- Choose File › New from Clipboard (⌘ N).
- Crop or mark it up if you like, then ⌘ S to save as PNG or JPEG.
That's also the quickest way to crop a copied screenshot before sending it: New from Clipboard, drag a selection, ⌘ K to crop, ⌘ A, ⌘ C, and paste the cropped version.
5. If the shortcut does nothing
- Check the shortcuts are on. Go to System Settings › Keyboard › Keyboard Shortcuts › Screenshots. The "Copy picture of…" entries should be ticked. Another app may have taken the same keys; change them here if needed.
- It saved a file instead. Control wasn't held at the moment of capture. Try again, holding all four keys.
- Paste does nothing. The place you're pasting into may only accept text (Terminal, many web form fields). Paste into Notes or Preview's New from Clipboard to confirm the image is there.
- Paste stopped working everywhere. See our copy and paste fixes; restarting the pboard process usually sorts it.
- Some windows come out black or blank. A few apps, such as video players showing protected content, block screen capture.
The catch: copied screenshots don't last
A screenshot on the clipboard isn't saved anywhere. The Mac clipboard holds one thing at a time, so the moment you copy a link or a sentence, the screenshot is gone. On macOS Tahoe, Spotlight's clipboard history (⌘ Space, then ⌘ 4) does keep copied images, screenshots included, but only for 8 hours by default (30 minutes, 8 hours or 7 days in System Settings › Spotlight). On older versions of macOS there's no history at all. Our clipboard history guide explains what it keeps and for how long.
If you often grab a screenshot, copy something else, and then wish you still had the picture days later (or you're not on Tahoe), you have two options: paste each screenshot somewhere straight away (a scratch note in Notes works well), or use a clipboard manager that keeps images in its history.
Desk Buddy
Desk Buddy is our clipboard manager for Mac, so read this part knowing that. It keeps a history of what you copy, including images, so a screenshot you copied with Control ⇧ ⌘ 4 is still there after you've copied ten other things. Press Control ⌘ V (or click the menu-bar icon, or Buddy, the little character at the edge of your screen) and click the copy you want; it pastes where you were typing.
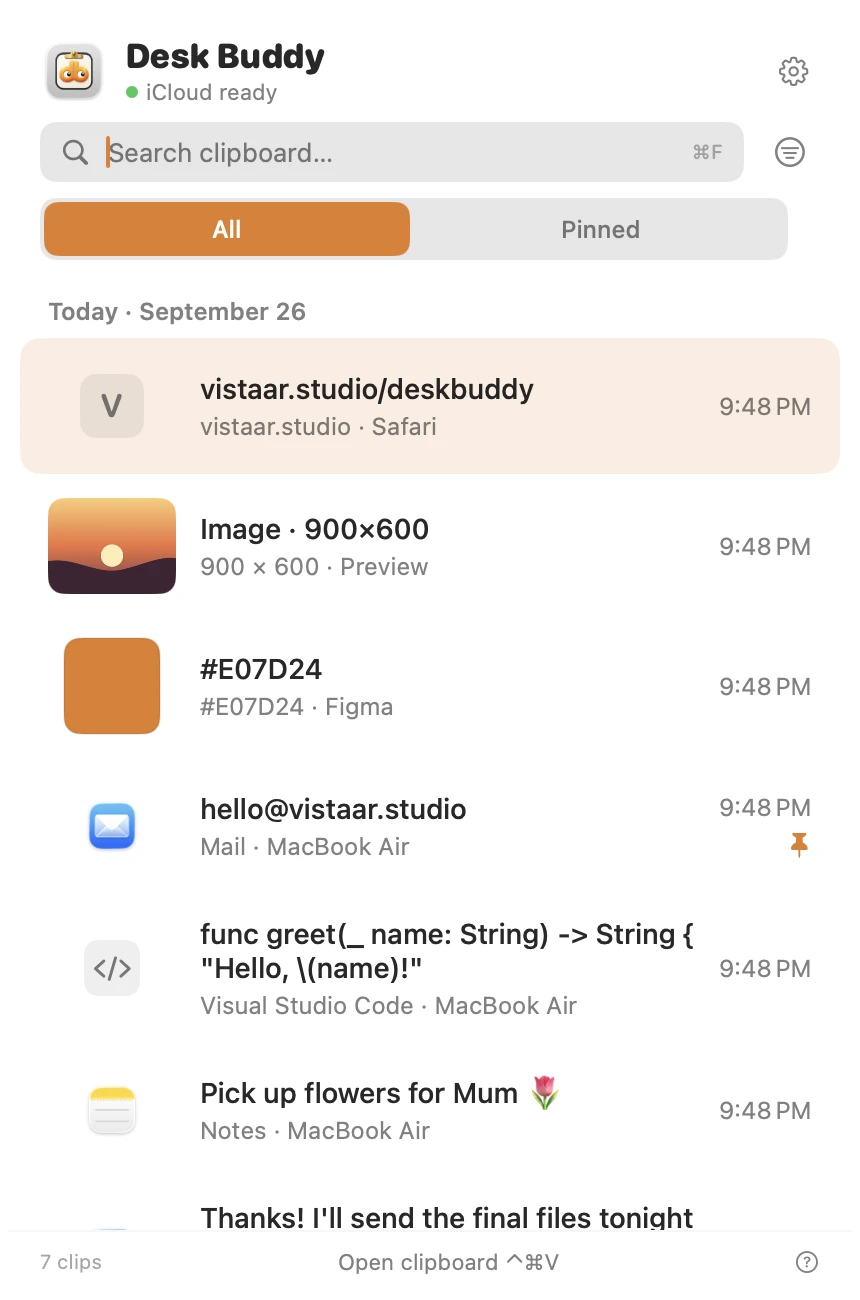
- Keeps text, links, images, colours, code and files.
- Search the history, pin things you reuse, and group copies into boards.
- Password managers are left out of history, and copies other apps mark as private are never saved.
- Optional sync of your history between your Macs through your own iCloud.
A tool to copy the text out of an area of the screen is coming in the next Desk Buddy update. Until then, macOS Live Text does that job: see how to copy text from an image on Mac.
Desk Buddy is available now from vistaar.studio as Desk Buddy Complete: $5 for 1 Mac (₹499 in India), paid up front, instant download. A Mac App Store edition is coming soon: a free download with a 7-day free trial, then a one-time $9.99 unlock. Meet Desk Buddy →
FAQ
What is the shortcut to copy a screenshot to the clipboard on a Mac?
Control ⇧ ⌘ 4 and drag for part of the screen, Control ⇧ ⌘ 3 for the whole screen. For one window, press Control ⇧ ⌘ 4, then Space, then click it.
Can I make every Mac screenshot go to the clipboard?
Yes: ⇧ ⌘ 5 › Options › Save to › Clipboard. Choose Desktop again to switch back.
Where do copied screenshots go on a Mac?
Only onto the clipboard; no file is saved. Paste it right away, or make it a file with Preview's File › New from Clipboard.
How do I save a copied screenshot as a file?
In Preview, choose File › New from Clipboard (⌘ N), then ⌘ S.
Why can't I paste my screenshot?
Either Control wasn't held (so it was saved to the desktop), the place you're pasting only takes text, or you copied something else afterwards.
Does macOS Tahoe clipboard history keep screenshots?
Yes, for a while: on macOS Tahoe, Spotlight's clipboard history keeps copied images, screenshots included, for 8 hours by default (up to 7 days). Press ⌘ Space, then ⌘ 4. Older macOS versions have no history.